Updated: October 17, 2020
Transplanting seedlings is fraught with potential problems. Transplant shock, root damage, too warm or cold weather, rainy weather and many other potential problems can stunt your plants’ growth or worse.
But at some point, you have to introduce your vegetable seedlings to the great outdoors. Here’s a step-by-step guide that will reduced the risk when transplanting your vegetable seedlings.
1. Measure soil temperature. It’s important to transplant seedlings only when the soil has reached the right temperature. You can learn more about using a soil thermometer to measure soil temperature at my article called Transplant at Proper Soil Temperature.
If you don’t plan on using a soil thermometer, you can always guess when the soil temperature is right. Many plants have a wide range of temperatures that will work.
Still, for most vegetable seedlings, transplanting at the right soil temperature will go a long way to reducing transplant shock.
2. Harden off seedlings. When you are measuring the soil temperature, it’s a good time to begin hardening off plants. Hardening off is the process of getting your seedlings used to the outside environment.
Ideally you are using paper pots or soil blocks. But most people are not.
— Suburban Hobby Farmer
Plants have to get use to the outdoors, especially the sun. It might be hard to believe, but plants (sort of) get sun burned when they haven’t had a chance to gradually build up exposure to direct sunlight.
Let’s take a sec to get the legal words out of the way. This article may contain affiliate links. That means if you click and buy from my partners, I will make a tiny amount of money at no cost to you. This in no way affects my recommendations.
Start by bringing your seedlings outside at the location where you are going plant them for an hour or so a day. Then, gradually increase the time each day.
I know this takes a lot of time out of your day to do it this way, but your plants will get a better start.
Be sure that the weather is not too windy. It’s easy for wind to permanently damage seedlings that are not used to the great outdoors.
I start off by putting them in the hoop house or cold frame if the temperatures are too low or it is windy.
3. Smooth and weed the planting area. I like to do this a week or so in advance. Then water and let the weeds germinate. Then weed again.
This greatly reduces the number of weeds. If you do this and cover the soil with mulch, too, you will significantly reduce the number of weeds during the growing season.
4. Measure from the bottom of the roots to the beginning of the stem. This helps to ensure that you dig the hole to the proper depth. Remember to add depth if you are going to add soil amendments such as compost.
Of course, if you use liquid fish and seaweed fertilizer, you don’t need to add depth.
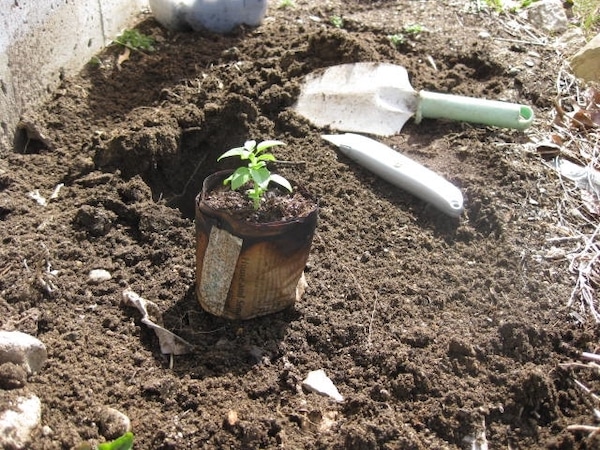
Transplanting seedlings into the ground
5. Dig your hole. If you’re going to add amendments, mix them into the bottom of the hole with dirt that you’ve removed from the hole. Make sure the bottom of the hole is reasonably level, so the plant will sit properly on the bottom.
6. Remove the pot. This may be the most difficult step. Ideally you are using paper pots or soil blocks. But most people are not.
At this point, there’s no question that soil blocks make the process easier. They are best at air pruning roots, too.
When using paper pots, I take a sharp razor blade and cut the pots slightly in areas where I don’t see any roots.
I do this to encourage the paper to break down in the ground. I’m careful not to disturb the roots and to make sure the root ball holds together.
This is especially important with things like cucumber seedlings which are sensitive to root disturbance.
If you are using peat pots, you don’t have any good options for allowing the roots to easily expand. With a plant that doesn’t mind a little root manipulation, you can cut the peat pot off from the root ball.
Some people just tear it off. Or you can leave it, but it will not break down enough so that it doesn’t hold the plant back at least somewhat.
When I dig up plants that were planted with peat pots intact, I’ve seen evidence that the plant has been stunted because it had difficulty breaking through the pot. I believe it takes a lot of effort for the plant to break through.
Only plants with hardiest root systems can completely break free of peat pots.
Related: The Benefits of Pruning Tomatoes
If you are using peat refills, you must cut off the mesh that is holding the peat. The mesh does not break down. If the roots have grown enough to be intertwined in the mesh this could be fatal.
With regular plastic pots, you should turn the plant upside down and encourage the plant out of the pot. Be careful to support the stem and root system when you slide it off.
Hopefully your seedlings are not too root bound. Plastic pots do not air prune the roots.
7. Plant. Place the seedling in the hole, add soil around the plant and press it in firmly. But not so firmly that all the air is squished out of the soil.
If it is a big plant, you may want to add a little water in the hole and around the sides as you fill in the sides. This will make sure that water reaches to all areas around the root ball.
Above ground
8. Add support for the plant. It’s better to add your support structures (stakes, cages, etc.) before the roots begin to grow.
Otherwise, you could damage the roots when pressing stakes into the ground. Some people take a chance and add them later because it is easier and more convenient.
9. Top dress with compost. My experience has been that seedlings do much better if you can add compost on top of the soil around the plants.
It may not seem like this will matter. But I’m sure it gives the plants a kick start and also helps water soak into the ground instead of running off.
10. Water deeply. At this point, it is very hard to water too much. Make sure you water a lot. This not only ensures the plant life giving moisture, it settles the soil.
11. Mulch. It’s best to add mulch after you have watered so that the water reaches the right places. For most of my seedlings, I put black and white newspaper down and cover it with mulched leaves after I’ve watered.
If you add mulch, you have to make sure water in penetrating the mulch and getting to the roots. So water deeply. If you do this, mulch will make it so you don’t have to water as often. It also adds nutrients and organic matter to the soil.
Related articles that might interest you:
- Getting Rid of Gnats on Seedlings
- Five Tips for Starting Seedlings More Cheaply
- Don’t Use Compost Tea on Seedlings
Suburban Hobby Farmer is a participant in the Amazon Services LLC Associates Program, an affiliate advertising program designed to provide a means for sites to earn advertising fees by advertising and linking to amazon.com.