Updated: August 13, 2020
Soil block makers and paper pots are two of the most thrifty and eco-friendly ways to start seeds. Both methods have clear advantages over peat or cow manure pots because they are less expensive and give the plants a healthy start on strong root systems.
This article looks at the pros and cons of both methods so you can decide which is best for your situation.
Table of Contents
This is a long, detailed article. You can jump to where you want to be by clicking on the different sections below. To come back to this table of contents, just use the back button on your browser.
Let’s take a sec to get the legal words out of the way. This article may contain affiliate links. That means if you click and buy from my partners, I will make a tiny amount of money. This in no way affects my recommendations.
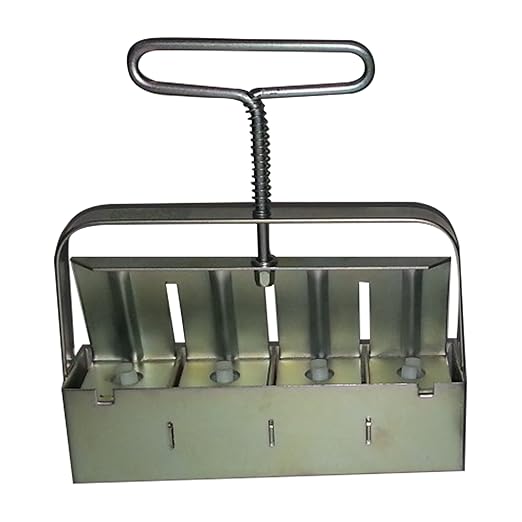
Soil block maker
The soil block method is the method of choice for experienced gardeners, especially those starting more than a couple of seedlings. A soil block is just what the name sounds like. It’s where you create a block of soil so that you can plant a seed in it.
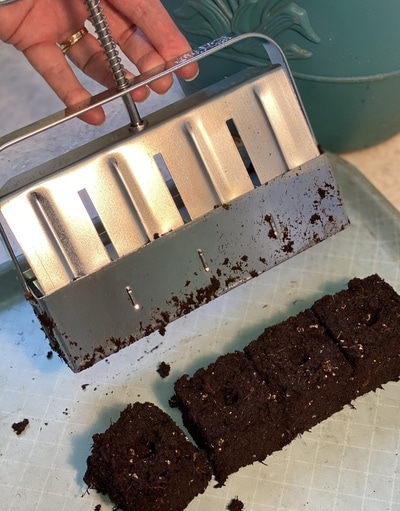
Most people create soil blocks using a soil block maker (a.k.a. soil pot maker), which essentially takes a special moist seed starting mix and packs it into a brick. Here’s a TLC video by farmer and author Eliot Coleman on how to work a soil block maker, and even how to make a rudimentary one yourself at almost no cost.
Paper pots
Paper pots, on the other hand, have found favor with less “serious” vegetable growers. This method involves creating a pot made out of newspaper and filling it with seed starting mix. Here’s a short video of how to make and fill paper pots:
Let’s look at the advantages of both methods.
Advantages of soil block makers
- Faster than paper pots. Once your soil is moistened, you can turn out lots of soil blocks quickly. Paper pots are more time consuming.
- No additional materials needed. You don’t need anything but the mix for soil blocks. Paper pots, of course, require newspaper (and I use a little masking tape to hold the pots together).
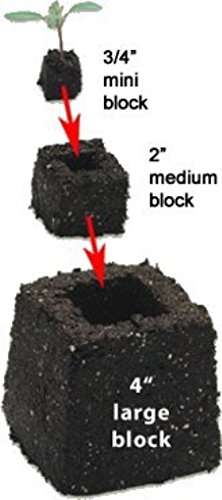
- Soil blocks are modular. This means that you can grow a bunch of seedlings in small blocks and transplant them easily into larger blocks when needed — without damaging the roots. This makes growing plants that are difficult to transplant (because of the likelyhood of root damage) possible.
- Air pruning avoids root bound plants. When roots come out of the soil, they naturally turn back away from the open air. This is called air pruning. This ensures that seedlings made with root blocks are never root bound … the roots don’t grow around and around at the bottom of your pot when they are looking for more soil to expand.
Paper pots, on the other hand, also facilitate air pruning because it’s pretty easy for roots to pass through paper into the open air. But soil blocks are better at root pruning because there’s nothing to block the roots — not even paper.
Soil block makers conserve space. Because they are square, you can put more soil blocks under the grow lights or in the hoop house. When storing, you can stack them on top of each other. On the other hand, paper pots take up lots of storage space both before and after the plants are under the lights.
Soil blocks don’t get moldy. I’m not sure why, but soil blocks are not as susceptible to mold compared to paper pots. This might be because the seed starting mix is sterile, while paper pot newspaper is not.
Soil block maker steps to success
If you decide to use a soil blocker, there are some easy but important steps for being successful:
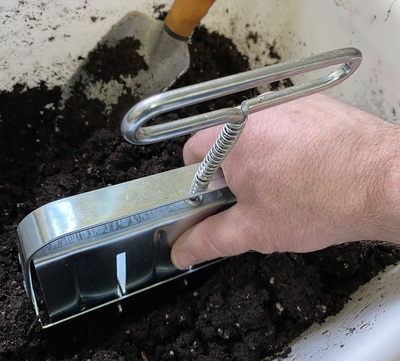
Wet your mix thoroughly so that it has a soft putty consistency. You’ll know if it’s right if, when you squeeze the mix in your hand, moisture should seep through your fingers.
It’s best to wet your mix at least a few hours before making blocks. That’s because water penetration of the seed starting mix is much better that way.

Germination is excellent in soil blocks
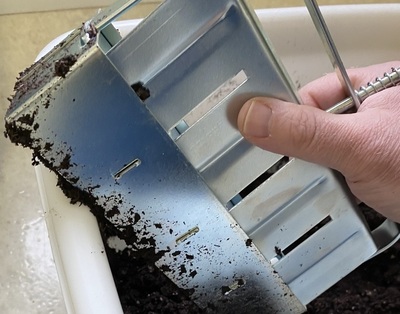
Each block has a small indent for accepting the seed. You should plant only one seed per block because the germination success rate is very high.
The seed will sprout on the surface of the moist block. You don’t need to water for two or three days. After that, you can use a fine spray from a hand pump mister.
Germination is excellent in soil blocks if you maintain the right moisture and temperature.
The main disadvantage to soil blocks
The one thing you really have to look out for when using soil blocks is the block falling apart. This is what happens:
The seedling looks great. It’s been growing for some time. Then you go to pick it up so you can transplant it. Then the block crumples in your hand.
The cause of this is either one or two thngs:
- Soil block moisture levels are either too high or two low. If you’ve just watered a soil block, don’t try to transplant it.
- Your seed starting mix is not engineered for soil blocks. Often, this is caused by too much peat in the mix. You need a little soil or wetting agent to hold the block together.
There is a simple way to guard against this problem. Use a spatula or some other flat support tool to pick up the block. This will hold it together until it’s safely planted.
Everything I Know About Starting Seeds
All my seed starting and seedling growing articles in one place.
Advantages of paper pots
- Reduced chance of root ball disintegration. Although not as sturdy as peat or plastic pots, paper pots hold together better than soil blocks. This becomes especially important if you don’t get the proper amount of moisture in your planting mix.
- Less mess. With soil block makers, the starter mix must be pre-moistened, which is a little bit messy. Both paper pots and soil blocks let you moisten before sowing by watering from the bottom. But since there is less disintegration with paper, the water in your tray is less muddy.
- Starter mix formulation is less complicated. With soil block makers the starter mix formulation has to be right so it will hold together in a brick. It must be moist enough to stick and not so soggy that it falls apart. To achieve this balance, the proportions of the mix ingredients (peat, coir, perlite, etc.) have to be right. It often takes a few batches to find the right proportions. With paper pots, the only recipe consideration is keeping the plants healthy.
- Layering of ingredients is possible. When I used to buy seed starting mix with out organic fertilizer, I would put organic potting soil on the bottom and seed starting mix on the top in my paper pots. This tactic provides a sterile environment at first to help young plants get past dampening off, but provides nutrients for the roots as they grow lower in the pot. This is not possible with soil block makers.
Clearly, there are advantages and disadvantages to both methods. Good luck with your seedlings, whatever method you use.
Related articles you might be interested in:
- Transplant Seedlings at Proper Soil Temps
- Product Review: Neptune’s Harvest Fertilizer
- Build an Easy, DIY Seedling Starting Unit
Suburban Hobby Farmer is a participant in the Amazon Services LLC Associates Program, an affiliate advertising program designed to provide a means for sites to earn advertising fees by advertising and linking to amazon.com.