• Skip to main content
  • Skip to secondary menu
  • Skip to primary sidebar
  • Skip to footer

Growing Organic Food in Your Backyard

Grow Better Food!
  • Home
  • Start Here
  • Seed Starting
  • Hoop House
    • Grow Tomatoes in a Hoop House
    • Grow Cucumbers in a Hoop House
    • How to Grow Carrots in Winter
    • Winter Sowing Made Better
  • Sponsor
  • Search
  • Subscribe

Saving Green Bean Seeds

by Bill Brikiatis

Updated: May 12, 2020

Why pay for green bean seeds when you can grow them yourselves? It’s one of the easier ways to save money with your garden.

But more to the point, once you find the type you like, you don’t have to worry about finding them in the store ever again. The seeds you save will be the same as last year’s.

Plus, if you save your own seeds year after year, you can custom-tailor them to your micro climate and soil conditions, possibly improving your yields with each generation.

To save green bean seeds, the pods should be so dry that they rattle when you shake them.

Can you save seeds from all varieties?

You can save seeds from most green bean varieties, since most are NOT from hybrid seeds. There may be SOME exceptions, but it’s not like tomatoes where you really have to be careful.

There are many hybrid tomatoes that won’t produce true, but that’s not the case with green beans. Even cross pollination of different varieties of green beans is rare in the backyard garden.

Related: Soil Block Makers Vs. Paper Pots. Which is Best for Starting Seedlings?

Let’s take a sec to get the legal words out of the way. This article may contain affiliate links. That means if you click and buy from my partners, I will make a tiny amount of money at no cost to you. This in no way affects my recommendations.

How to save green bean seeds

Time needed: 80 days.

Saving green bean seeds is easy. All you have to do is follow this eight step method:

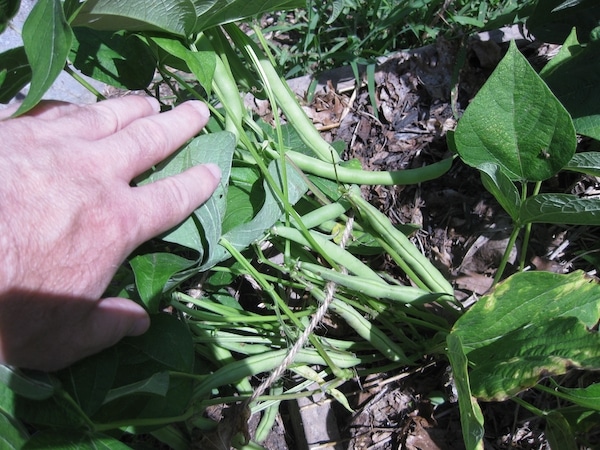
  1. Select your best two green bean plants.

    You may need to select more plants if you want more seeds. It’s better to have more than enough than too little. A very rough estimate is that one bush bean plant will give you 50 seeds.

    The plants you select will be your seed growers. That’s why you want to select the best possible plants to have seeds with the best possible genome for your specific garden.

    Your should select seed growing plants that (1) are the first to produce mature beans, (2) are tall and strong with dark green leaves, (3) have a high number of pods.

  2. Mark the seed growing plants and wait.

    You can tie a string around them (or something). Then you can eat the beans from the seed growers until they finish their second big flurry of giving beans. After that, let the new pods grow for the rest of the season. These new pods are your seed pods. They must grow to maturity. When you stop picking green beans the plants will slowly stop producing.

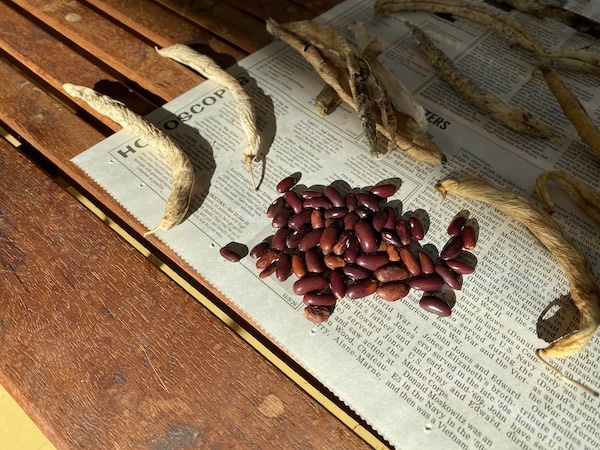
  3. Pick the dried out pods.

    For green beans, you need to wait until the pods turn completely brown or brown-yellow. They shouldn’t have any green on them. You will know that the seeds are ripe when you shake the pods and hear the rattle of beans moving around inside. When you squeeze the pods they should be crunch to the touch. Then you know they are ready to pick.

  4. Leave the pods to dry out completely.

    At this stage you should put the picked pods somewhere dry so that they dry out completely. There should be no green or moisture on the pod. Only save the perfect looking pods.

  5. Remove the seeds from the pods.

    Try not to damage the seeds when you are removing them from the pods. Only save the perfect seeds. You can throw away any seeds that are insect-eaten, wrinkled, a different color from the rest or smaller than average.

  6. Place seeds on a paper towel to air dry.

    Allow them to air out and harden for several days. Obviously, you need to keep them away from any moisture.

  7. Store the seeds in a clean, dry container.

    I use a container that allows air flow. But if you do this, you need to make sure there’s absolutely no moisture.

  8. Label the bean containers.

    At the very least, you need to mark the year and the specific variety so you don’t forget. I save provider green beans because they seem to do well in my area.

Provider Green Beans
Saving green bean seeds is easy. Just don’t save seeds from pods that have been chewed on by insects.

That’s really all there is to it. Now you’re all set for next season.

Related articles you might enjoy:

  1. Free Seeds from the Government
  2. Is Fermenting Tomato Seeds Necessary?
  3. Free 30-page Seed Saving Guide

Suburban Hobby Farmer is a participant in the Amazon Services LLC Associates Program, an affiliate advertising program designed to provide a means for sites to earn advertising fees by advertising and linking to amazon.com.

Pin
Share
Tweet

Filed Under: 1. Beginner -- Easy to Complete, Seeds, Third Tagged With: seed saving, spotlight

Primary Sidebar

Meet the Blogger

Bill Brikiatis

Hello! I’m Bill Brikiatis. I started this website in 2010 to help you get better at growing organic food in your backyard.

I’ve been growing fruits and vegetables for nearly all my life. And I'm over 60.

That’s not to say that I don’t make mistakes. I make plenty, then I write about them so both you and I get better at growing great things to eat.

You can read more about me and Suburban Hobby Farmer on my about page.

Most Popular on SHF

  1. How to Get Free Seeds from the U.S. Government. It's Easy If You Know How
  2. How to Use Chicken Manure Pellets in the Vegetable Garden
  3. Which Seed Starting Mix is Best? I Tested Them
  4. What Are the Benefits of Pruning Tomato Plants?
  5. I've Used a Rain Barrel Downspout Diverter for 10 years. Here's What I Know.
  6. Grow Millions of Cucumbers in a Hoop House
  7. I Shopped for Hoop House Kits. A Review of the One I Bought.
  8. Do Tumbling Compost Bins Work?
  9. Can you plant potatoes in the fall? Absolutely!
  10. What are the Best Potting Benches for Vegetable Growers?

Search This Site for Articles

Growing Tomatoes

Growing Tomatoes

Learn Everything I Know About Growing Tomatoes

Extending the Growing Season

  1. A Hoop House is a Tomato Growing Machine
  2. Coldframe Kits Make It Easy to Extend the Growing Season
  3. Grow a Million Cucumbers in a Hoop House
  4. I Shopped for Hoop House Kits. A Review of the Three I Considered
  5. Growing Salad Greens in Winter. Here's How to Do It
  6. Better Tomatoes with Walls O Water
  7. How to Grow Carrots in Winter
  8. Winter Sowing Made Better

Improving Soil

  1. How to Use Chicken Manure Pellets
  2. Three Important Soil Building Techniques
  3. Grasscycling and Composting Grass Clippings
  4. What is "Deep Litter" in a Chicken Coop?
  5. Why Grow Cover Crop and Which Ones?
  6. Mulching Raised Garden Beds
  7. Five Gardening Ideas from Building Soils Naturally
  8. Should You Use Neptune's Harvest Liquid Fertilizer?
  9. How to Use Aquarium Fish Water to Fertilize Plants
  10. Using Chop & Drop to Improve Your Soil
  11. How to Improve Your Soil
  12. What is OMRI? Why Should Organic Gardners Care?
  13. Winter Ground Covers for Vegetable Gardens

Collecting Water with Rain Barrels & Downspout Diverters

  1. My Automatic Downspout Diverter
  2. Rain Barrel Downspout Diverters
  3. Fixing an Overflowing Rain Barrel
  4. Oatey Mystic Rainwater Collection System / Downspout Diverter

Composting Articles

  1. Do Tumbling Compost Bins Work?
  2. How to Compost Faster
  3. Worm Composting Not So Easy
  4. Worm Composting Not So Easy, Part II
  5. Worm Composting Not So Easy, Part II
  6. Free, 77-page Worm Composting Guide
  7. Grasscycling and Composting Grass Clippings
  8. The Best Worm Food
  9. Making Compost in a Chicken Coop

Footer

My Recommendations

  • Start Here
  • Subscribe
  • Things I Like

SHF Info

  • Advertising Info
  • Affiliate Policy
  • Article Sponsorship
  • Privacy

Blogger

  • About
  • Contact

© Suburban Hobby Farmer 2020