I’ve been starting seeds for over 10 years. During that time, I’ve made all the mistakes. One year, for example, I bought bad seed starting mix. My seedlings were so bad I had to throw them all out. I ended up buying seedlings at the local nursery.
Over the years, I’ve learn some important lessons. Below are the 10 most important things I’ve learned:
Table of Contents
This is a long, detailed article. You can jump to where you want to be by clicking on the different sections below. To come back to this table of contents, just use the back button on your browser.
Let’s take a sec to get the legal words out of the way. This article may contain affiliate links. That means if you click and buy from my partners, I will make a tiny amount of money at no cost to you. This in no way affects my recommendations.
1. Use the best seeds possible
Of the 10 tips, this one is the most important. Why? Because even if you do everything else perfect, you won’t have good seedlings unless you start with good seeds.
Think about it. We all know the person who eats really bad and never gets any exercise, yet they are thin and healthy because it’s in their genes.
It’s the same way with plants. Making sure the seeds have good genes is most important. Everything else is secondary.
Buying inexpensive seeds to save money isn’t worth it. The pennies you save will be lost the first time your plants don’t measure up.
Plus, the cost of vegetable gardening isn’t in the seeds. It’s in the seed starting mix and the electric lights and fertilizer and the other supplies you consume to make your garden.
But even good seeds have to be right for your garden. Sometimes good seeds don’t work out because they don’t have the right growing conditions or soil type. Often, problems are caused by the wrong pH.
Once you find the right seeds for your backyard, you should save them year after year (if they produce true). I had two different green bean seeds. One produced well and the other didn’t. I assume something in the genetics of that bad performer just wasn’t right for my garden.
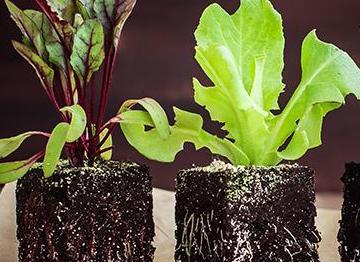
Starting Seeds in Soil Blocks has Many Advantages
Go “pot-less” with your seedlings!
Now I save the good green bean seeds year after year. I don’t have to buy seeds. More importantly, I’m reasonably certain that they are going to do well.
2. Use the best seed starting mix
The best seedlings result from the best seed starting mix. I tested this. You can read about my test at The Best Seed Starting Mix.
There’s no question. Which seed starting mix you use makes a big difference.
Good seed starting mix has to be light weight. It has to be light enough so that the roots of your baby seedlings can move through it easily. The most common seed starting problem I have, especially with cucumbers, is that the plants can’t get started because the seed starting mix is too heavy.
On the other hand, if you are using a soil block maker (as I do), the seed starting mix has to hold together. Otherwise, when you go to transplant your seedlings, the root ball will fall apart.
You probably can see how being light weight and holding together are somewhat mutually exclusive. So you have to pick the right seed starting mix.
3. Use a soil block maker
A soil block maker allows you to start seedlings without a pot. I like to call this “going pot-less.”
Seedlings grown in soil blocks have many advantages:
- The roots are air pruned.
- The seedlings take up less space under the lights or in the hoop house
- They are easier to transplant
- They are cheaper than buying pots
4. Water from the bottom up
Soon after you first plant your seeds, you’re going to have to water. When you water from the top, the seeds tend to move around because seed starting mix is lighter even than soil.
The most common seed starting problem is the plants don’t get enough light.
— Suburban Hobby Farmer
If the seeds have started growing roots, you risk ripping the micro roots, which forces the seed to start building roots again. The result is a slower start to seed starting.
If the seeds move around day after day, it may even kill the seedlings.
Here’s how you fix this problem: If you’re using paper pots or, even better, soil blocks you can put water in the bottom of the tray. This encourages roots to grow towards the bottom and doesn’t move the seeds around.
It also helps prevent dampening off. This is because the seed starting mix will get less wet on the top and will dry out sooner. Constant moisture at the surface promotes dampening off.
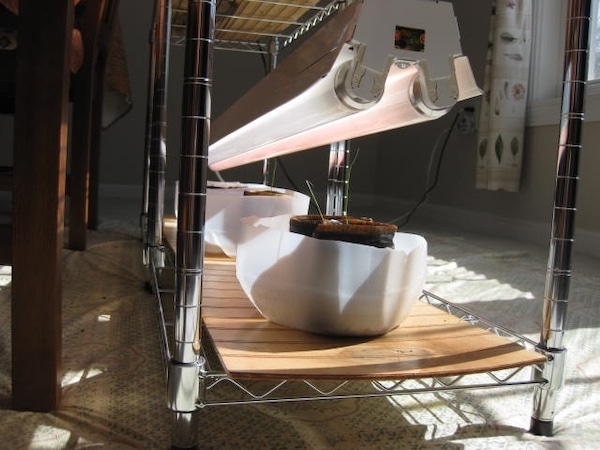
5. Give them enough light
The most common seed starting problem is the plants don’t get enough light. Either the lights aren’t bright enough. Or they’re not close enough to the plants. Or light from the window alone isn’t enough.
I solve this in one of two ways. I either set my DIY seed starting light stand next to a south facing window. Or, if it’s warm enough, I put plants in the hoop house or the cold frame.
If I’m using a light stand, I make sure the lights are close enough to the plants. Even better, I use a light stand and a window. This almost always has good results.
The best option is outside in a hoop house or a cold frame or winter sowing. There’s always enough light.
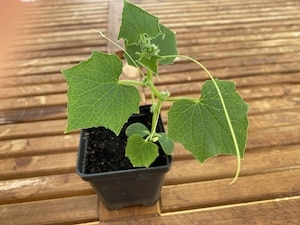
6. Transplant into pots when you need to
Anytime you transplant, your plants are going to go into shock until they get used to their new home. But repotting is a necessary evil when your seedlings run out of room. In fact, it’s best to transplant before your plants get pot bound.
When you transplant, be sure to put your plants in nutrient rich potting soil. Once the plants have grown big enough to transplant, there is little risk of dampening off. So you don’t need to restrict nutrients any longer.
7. Apply liquid fertilizer
Liquid fertilizer, such as Neptune’s Harvest Fish and Seaweed fertilizer, is ideal for seedlings.
This is because seedlings don’t yet have mature root systems and they can’t extract enough nutrients from the soil to feed fast growing foliage and roots. Liquid fertilizer, on the other hand, is easily digested by young plants.
It acts as a shot of adrenaline that encourages root system growth and greens foliage almost the minute you add it to the soil or apply it to the leaves (foliar feeding).
But there is another reason why it’s good for seedlings. You can easily adjust the strength of liquid fertilizer by adding more or less water. Dilute the fertilizer for young plants so that you don’t over encourage leaf growth. Add less water for more mature seedlings that can take advantage of a great shot of fertilizer.
But liquid fertilizer is not a long term solution. It only lasts for a short time. Easy come, easy go. Hopefully, the effects of the liquid fertilizer last long enough for root systems to mature and seedlings are established in their permanent home.
Related: Don’t Use Compost Tea on Seedlings
8. Hardening off seedlings
It’s a shame to invest all that time and effort into coddling your seedlings and have them do badly once you transplant them in the ground.
Plants never enjoy being transplanted. How would you like it if suddenly you were moved to a new home that’s colder with harsh sunlight and much more wind?
You can mitigate some of this shock when planting seedlings. You do this by hardening off your seedlings before planting. Hardening off is the process of slowly getting them used to their new home.
This helps plants adjust to new temperatures and avoid “sunburn” that plants experience when the intensity of the light outdoors is much more than they were used indoors.
Everything I Know About Starting Seeds
All my seed starting and seedling growing articles in one place.
9. Transplant at the proper soil temperature
Although proper air temperature is important to seedlings, soil temperature is even more important.
The temperature may be warm or even hot outside, but until the soil temperature is right, your plants will suffer. Those who guess wrong about the soil temperature requirements often blame poor results on transplant shock.
But often the problem is caused by soil temperature that isn’t nearly warm enough. The only way to know for sure is to use a soil thermometer.
You can learn more about the soil temperature requirements for different plants here.
10. Plant your seedlings properly
Each plant has special requirements for how best to transplant them into their permanent home.
Tomatoes, for example, require that you remove the first few leaf stems and plant them in the dirt up to their first (remaining) leaf stems. Other vegetables do better in wells so that the water drains to the plant’s roots. Still others do better in mounds or raised beds because they prefer well drained soil.
The point is you need to know the special requirements of your seedlings or all the previous coddling in the world won’t have the desired effect.
So there you have it. If you follow these 10 tips for success, chances are that you will have a very good outcome.
Related articles you might enjoy:
- Build a DIY Seed Starting Light Stand for Not Much Money
- How to Start Your Seedlings More Cheaply
- How to Get Rid of Gnats on Seedlings
Suburban Hobby Farmer is a participant in the Amazon Services LLC Associates Program, an affiliate advertising program designed to provide a means for sites to earn advertising fees by advertising and linking to amazon.com.